NOTE: Apart from

You can see how this translation was done in this article.
Wednesday, 07 August 2024
//5 minute read
This is a fairly simple article but will cover some of the odness of using FluentEmail in ASP.NET Core to send HTML emails I haven't seen elsewhere.
Sending HTML mails is itself kinda simple with SmtpClient, but it's not very flexible and doesn't support things like templates or attachments. FluentEmail is a great library for this, but it's not always clear how to use it in ASP.NET Core.
FluentEmail with Razorlight (it's built in) allows you to template your emails using Razor syntax. This is great as it allows you to use the full power of Razor to create your emails.
Firstly, you need to install the FluentEmail.Core, FluentEmail.Smtp & FluentEmail.Razor libraries:
dotnet add package FluentEmail.Core
dotnet add package FluentEmail.Smtp
dotnet add package FluentEmail.Razor
To keep things separate I then created a IServiceCollection extension which sets up the FluentEmail services:
namespace Mostlylucid.Email;

public static class Setup
{
    public static void SetupEmail(this IServiceCollection services, IConfiguration config)
    {
          var smtpSettings = services.ConfigurePOCO<SmtpSettings>(config.GetSection(SmtpSettings.Section));

        services.AddFluentEmail(smtpSettings.SenderEmail, smtpSettings.SenderName)
            .AddRazorRenderer();

        services.AddSingleton<ISender>(new SmtpSender( () => new SmtpClient()
        {
            DeliveryMethod = SmtpDeliveryMethod.Network,
            Host = smtpSettings.Server,
            Port = smtpSettings.Port,
            Credentials = new NetworkCredential(smtpSettings.Username, smtpSettings.Password),
            EnableSsl = smtpSettings.EnableSSL,
            UseDefaultCredentials = false
        }));
        services.AddSingleton<EmailService>();

    }

}
##SMTP Settings
As you'll see I also used the IConfigSection method mentioned in my previous article to get the SMTP settings.
var smtpSettings = services.ConfigurePOCO<SmtpSettings>(config.GetSection(SmtpSettings.Section));
This comes from the appsettings.json file:
"SmtpSettings":
  {
    "Server": "smtp.gmail.com",
    "Port": 587,
    "SenderName": "Mostlylucid",
    "Username": "",
    "SenderEmail": "[email protected]",
    "Password": "",
    "EnableSSL": "true",
    "EmailSendTry": 3,
    "EmailSendFailed": "true",
    "ToMail": "[email protected]",
    "EmailSubject": "Mostlylucid"

  }
Note: For Google SMTP if you use MFA (which you *really should you'll need to make an app password for your account.
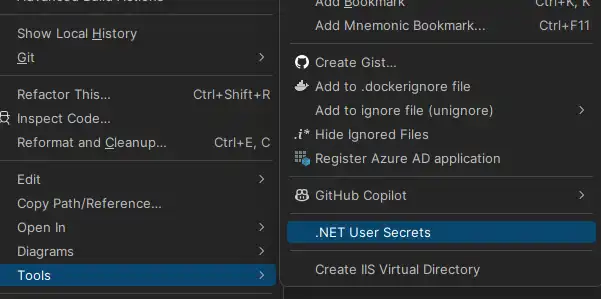
For local dev, you can add this to your secrets.json file:

For docker compose use you'd normally include this in a .env file:
SMTPSETTINGS_USERNAME="[email protected]"
SMTPSETTINGS_PASSWORD="<MFA PASSWORD>" -- this is the app password you created
Then in the docker compose file you inject these as env variables:
services:
  mostlylucid:
    image: scottgal/mostlylucid:latest
    ports:
      - 8080:8080
    environment:
      - SmtpSettings__UserName=${SMTPSETTINGS_USERNAME}
      - SmtpSettings__Password=${SMTPSETTINGS_PASSWORD}
Take a note of the spacing as this can really mess you up with docker compose. To check what's injected you can use
docker compose config
To show you what the file looks like with these injected.
One issue with Fluent Email is you need to add this to your csproj
  <PropertyGroup>
    <PreserveCompilationContext>true</PreserveCompilationContext>
  </PropertyGroup>
This is because FluentEmail uses RazorLight which needs this to work.
For the template files, you can either include them in your project as Content files or as I do in the docker container, copy the files to the final image
FROM build AS publish
RUN dotnet publish "Mostlylucid.csproj" -c $BUILD_CONFIGURATION -o /app/publish /p:UseAppHost=false

FROM base AS final
WORKDIR /app

COPY --from=publish /app/publish .
# Copy the Markdown directory
COPY ./Mostlylucid/Markdown /app/Markdown
COPY ./Mostlylucid/Email/Templates /app/Email/Templates
# Switch to a non-root user
USER $APP_UID
Ok back to the code!
Now we have it all set up we can add the Email Service. This is a simple service that takes a template and sends an email:
public class EmailService(SmtpSettings smtpSettings, IFluentEmail fluentEmail)
{
    public async Task SendCommentEmail(string commenterEmail, string commenterName, string comment, string postSlug)
    {
        var commentModel = new CommentEmailModel
        {
            PostSlug = postSlug,
            SenderEmail = commenterEmail,
            SenderName = commenterName,
            Comment = comment
        };
        await SendCommentEmail(commentModel);
    }

    public async Task SendCommentEmail(CommentEmailModel commentModel)
    {
        // Load the template
        var templatePath = "Email/Templates/MailTemplate.template";
        await SendMail(commentModel, templatePath);
    }

    public async Task SendContactEmail(ContactEmailModel contactModel)
    {
        var templatePath = "Email/Templates/ContactEmailModel.template";

        await SendMail(contactModel, templatePath);
    }


    public async Task SendMail(BaseEmailModel model, string templatePath)
    {
        var template = await File.ReadAllTextAsync(templatePath);
        // Use FluentEmail to send the email
        var email = fluentEmail.UsingTemplate(template, model);
        await email.To(smtpSettings.ToMail)
            .SetFrom(smtpSettings.SenderEmail, smtpSettings.SenderName)
            .Subject("New Comment")
            .SendAsync();
    }
}
As you can see here we have two methods, one for Comments and one for the Contact form (send me a mail! ). In this app I make you log in so I can get the mail it's from (and to avoid spam).
Really most of the work is done here:
 var template = await File.ReadAllTextAsync(templatePath);
        // Use FluentEmail to send the email
        var email = fluentEmail.UsingTemplate(template, model);
        await email.To(smtpSettings.ToMail)
            .SetFrom(smtpSettings.SenderEmail, smtpSettings.SenderName)
            .Subject("New Comment")
            .SendAsync();
Here we open a template file, add the model containing the content for the email, load it into FluentEmail and then send it. The template is a simple Razor file:
@model Mostlylucid.Email.Models.ContactEmailModel

<!DOCTYPE html>
<html class="dark">
<head>
    <title>Comment Email</title>
</head>
<body>
<h1>Comment Email</h1>
<p>New comment from email @Model.SenderEmail name @Model.SenderName</p>

<p>Thank you for your comment on our blog post. We appreciate your feedback.</p>
<p>Here is your comment:</p>
<div>
    @Raw( @Model.Comment)</div>
<p>Thanks,</p>
<p>The Blog Team</p>

</body>
</html>
These are stored as .template files in the Email/Templates folder. You CAN use .cshtml files but it causes a problem with the @Raw tag in the template (it's a razorlight thing).
Finally we get to the controller; it's really pretty straightforward
    [HttpPost]
    [Route("submit")]
    [Authorize]
    public async Task<IActionResult> Submit(string comment)
    {
        var user = GetUserInfo();
            var commentHtml = commentService.ProcessComment(comment);
            var contactModel = new ContactEmailModel()
            {
                SenderEmail = user.email,
                SenderName =user.name,
                Comment = commentHtml,
            };
            await emailService.SendContactEmail(contactModel);
            return PartialView("_Response", new ContactViewModel(){Email = user.email, Name = user.name, Comment = commentHtml, Authenticated = user.loggedIn});

        return RedirectToAction("Index", "Home");
    }
Here we get the user info, process the comment (I use a simple markdown processor with Markdig to convert markdown to HTML) and then send the email.